Deploy and Attach Azure Disk Pool to Azure VMware Solution Private Cloud
Azure Disk Pools was recently released, and this is an excellent addition to the Azure VMware Solution toolset.
For more details on why you would choose to use Disk Pool, and what Disk Pools are, check out this article.
When I recently ran through some testing of Azure Disk Pools, the instructions were comprehensive. However, for VMware folks who haven’t used Azure much or at all, the guidance below may help expedite deployment.
The following guidance will show how to deploy the disk pool, add disks to the disk pool and attach a datastore to the Azure VMware Private Cloud (vSphere Cluster).
The first thing that needs to happen is registering the appropriate resource provider to the subscription.
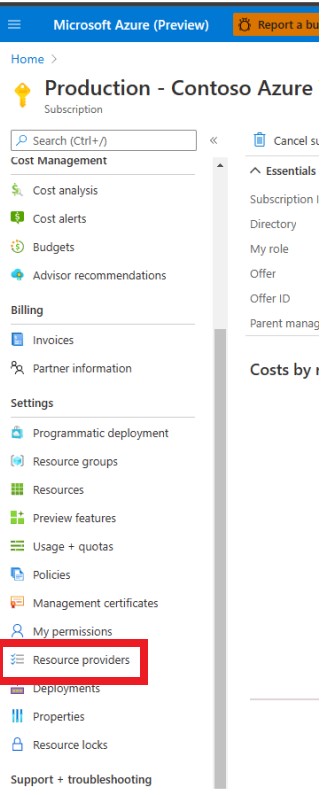
Log into the Azure portal and navigate to the subscription where Azure VMware Solution is deployed, on the left hand side of the screen find and select Resource Providers.
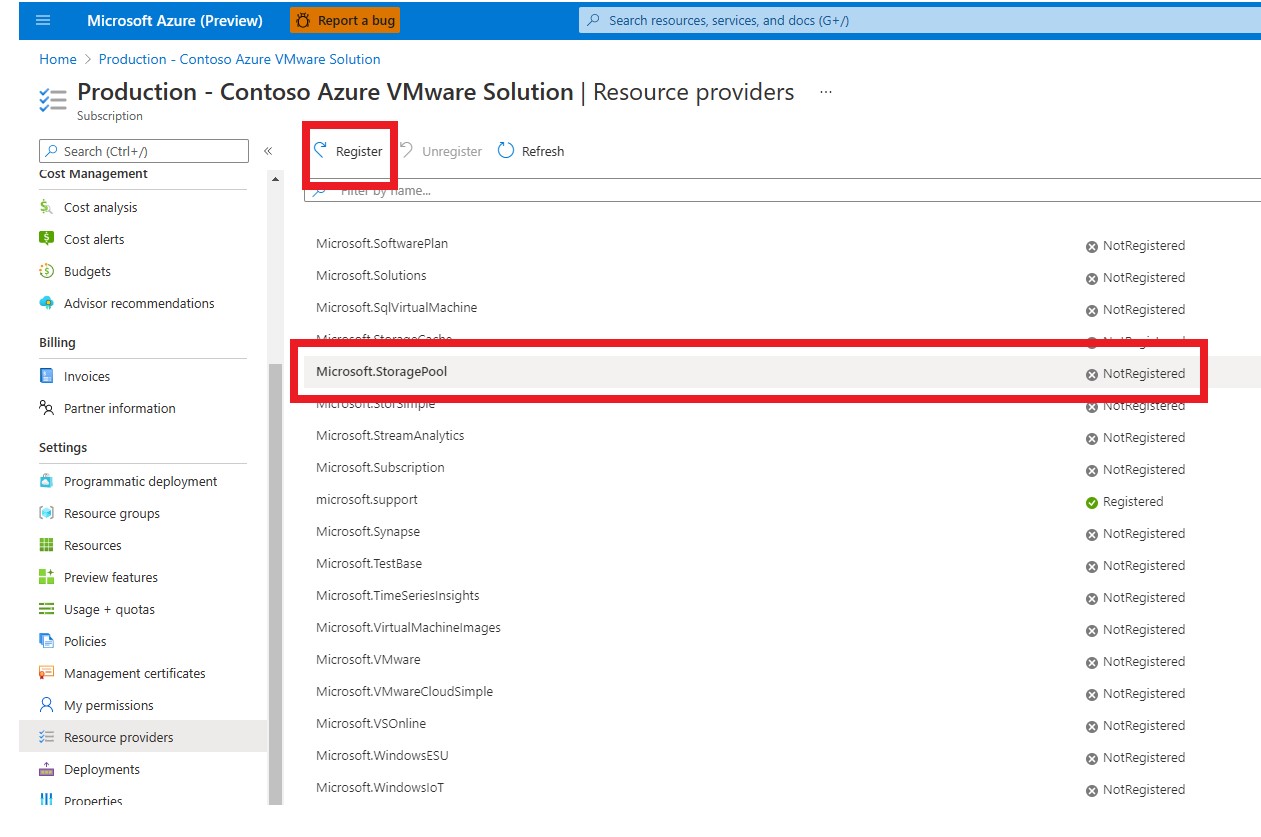
Find the Microsoft.StoragePool Resource provider and register it.
Now that the Resource Provider is registered, the Virtual Network where the Azure Disk Pool will be created needs to be identified. Within that Virtual Network, the subnet for the Disk Pool needs to be identified or created. Think of a virtual network as a large-scale network range, i.e., 10.10.0.0/16, within the virtual network subnets are created as needed, i.e., 10.10.1.0/24, 10.10.2.0/24, etc. Ideally, the region where AVS, the Virtual Network, and the disks are the same.
Once we have identified or created the virtual network and subnet, we will delegate that subnet to the Disk Pool.
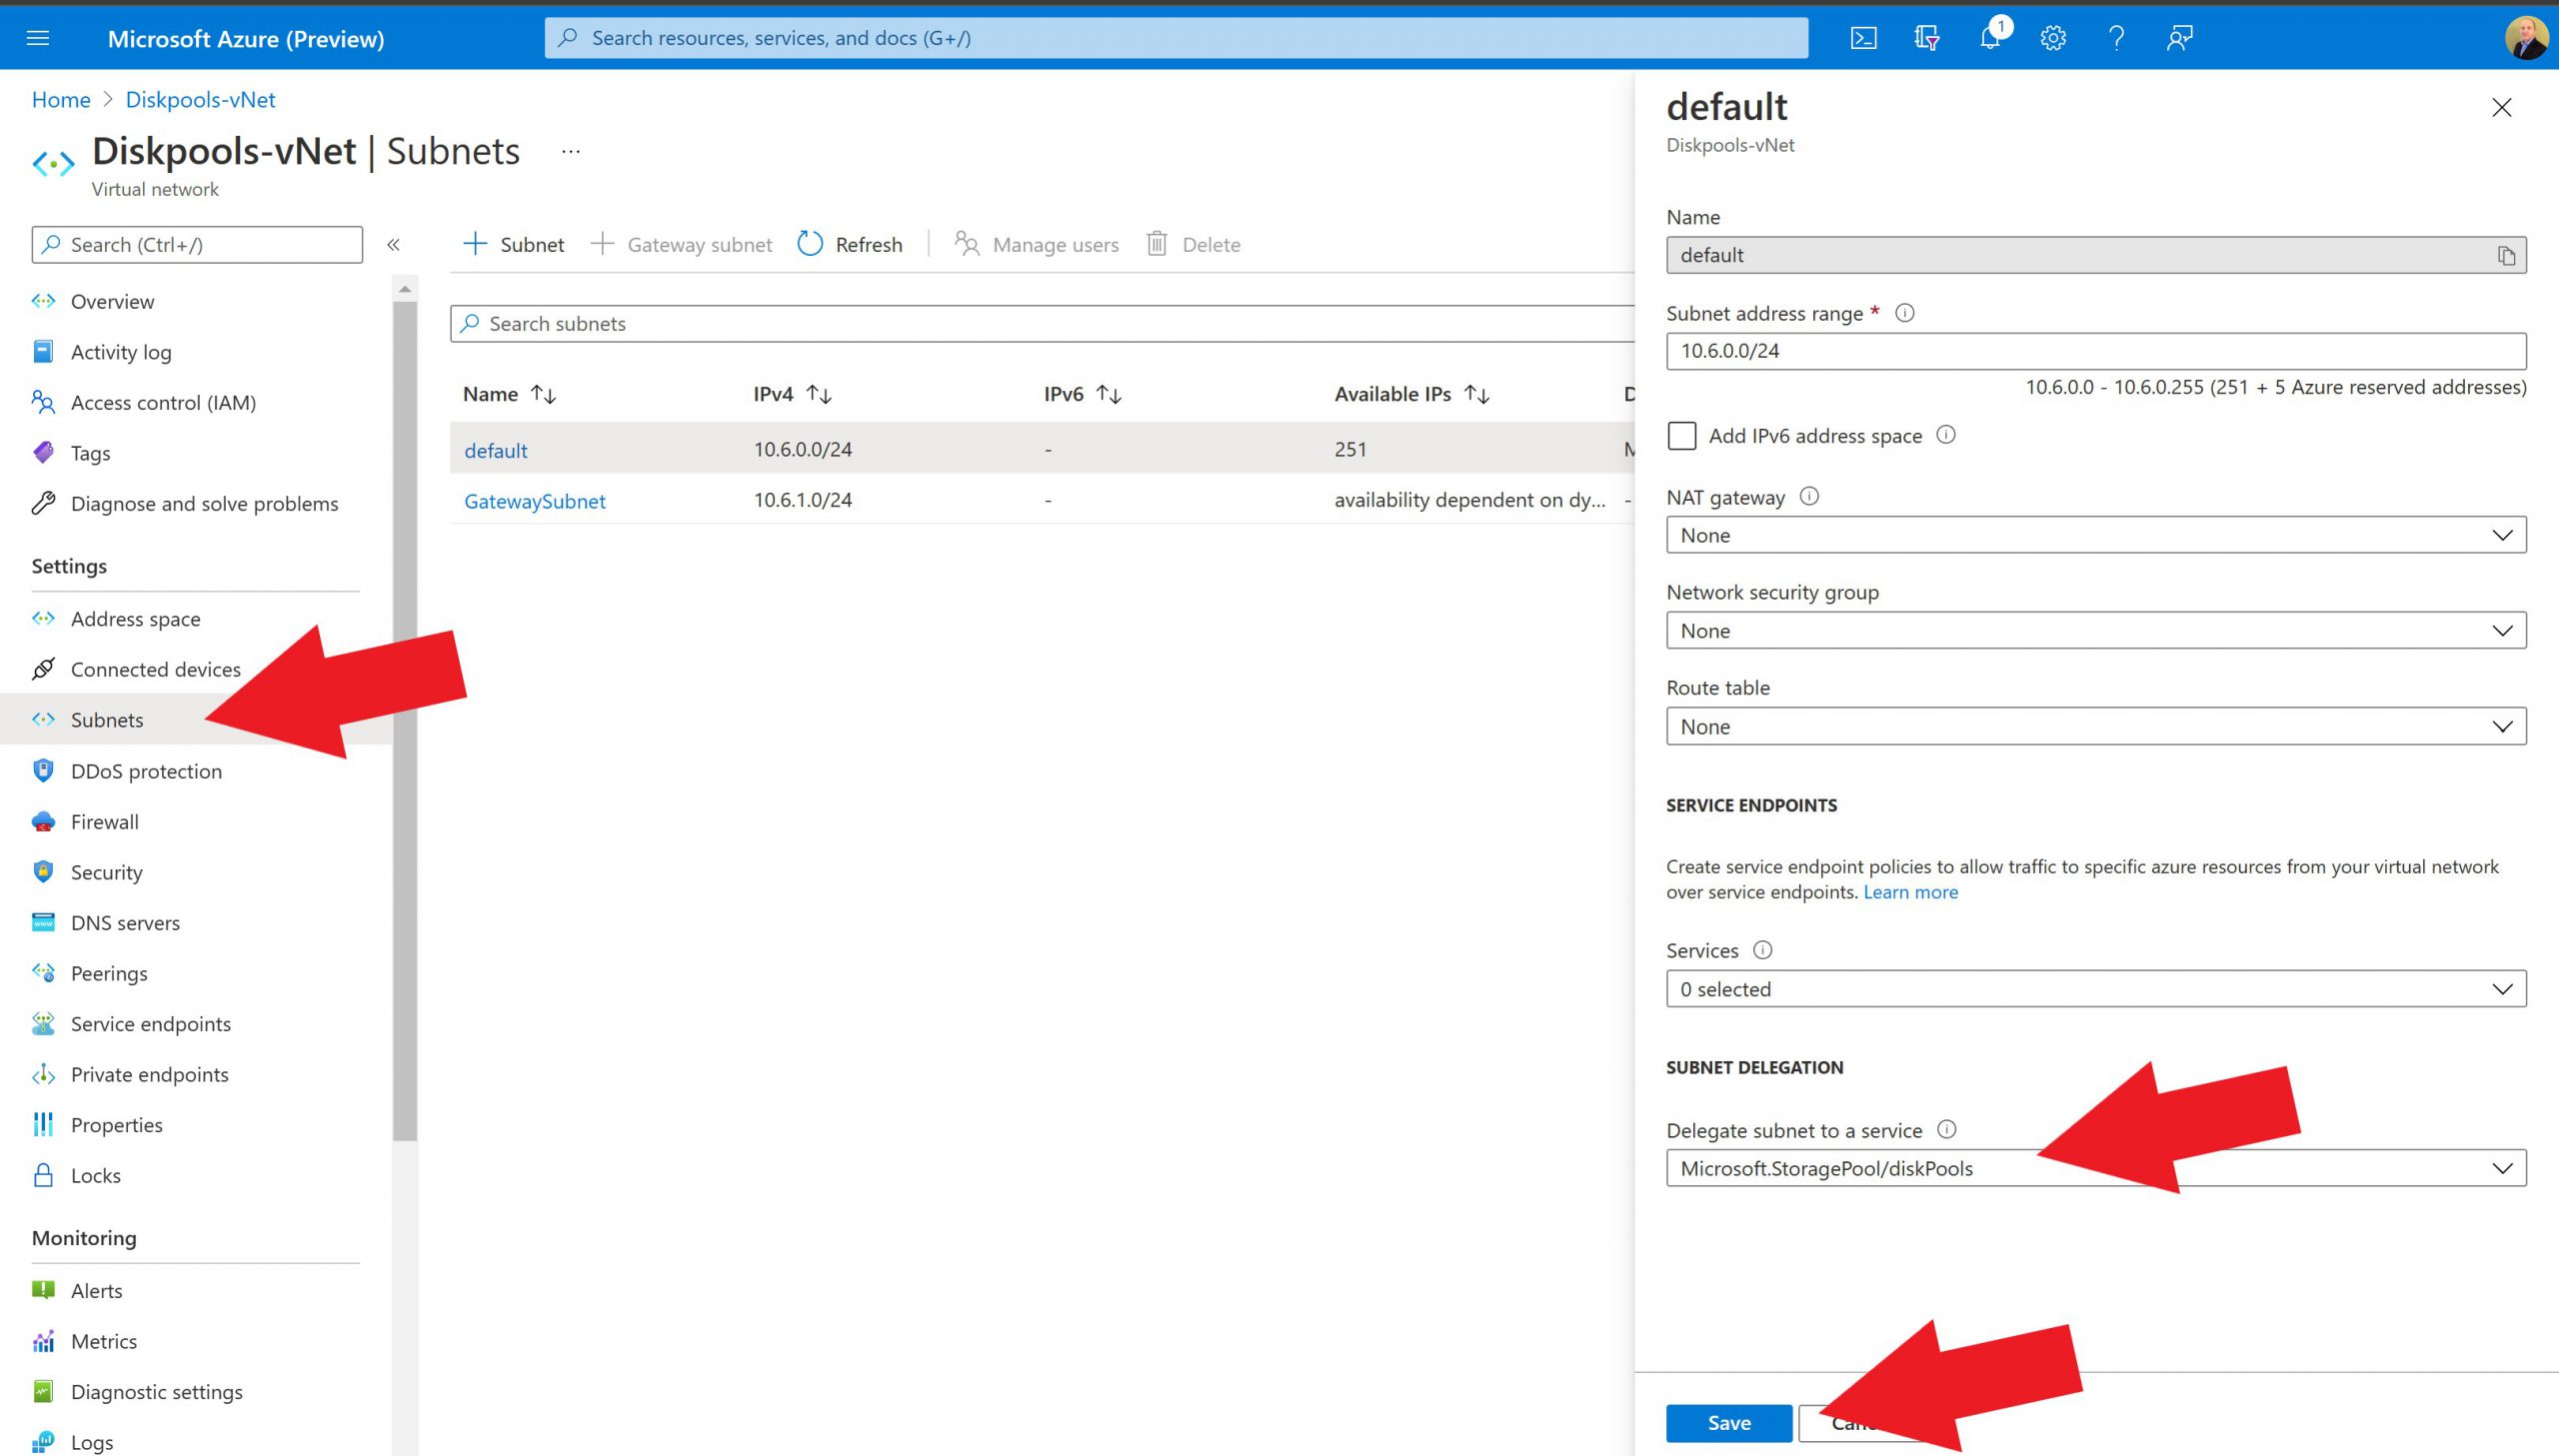
To delegate a subnet to your Azure disk pool navigate to the virtual network.
On the left, select subnets
Either create or edit the subnet, and Delegate Subnet to a Service, and choose Microsoft.StoragePool/diskpools
Now, let’s shop for some disks. The next step is to identify and provision the disk(s) to the Disk Pool and ultimately attach (each) as a datastore to the AVS private cloud. It’s impossible to advise what disk is the right choice for each use case; it’s a case-by-case basis. This is an excellent link to reference.
https://docs.microsoft.com/en-us/azure/virtual-machines/disks-pools-planning
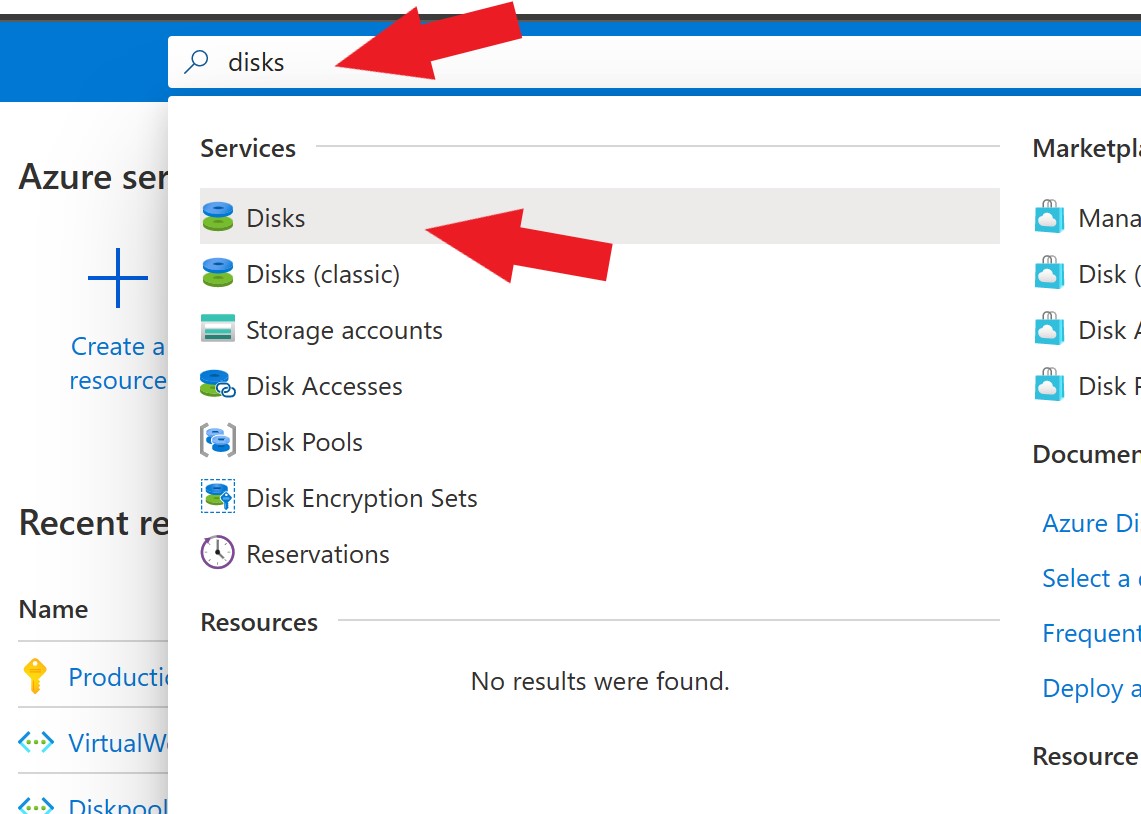
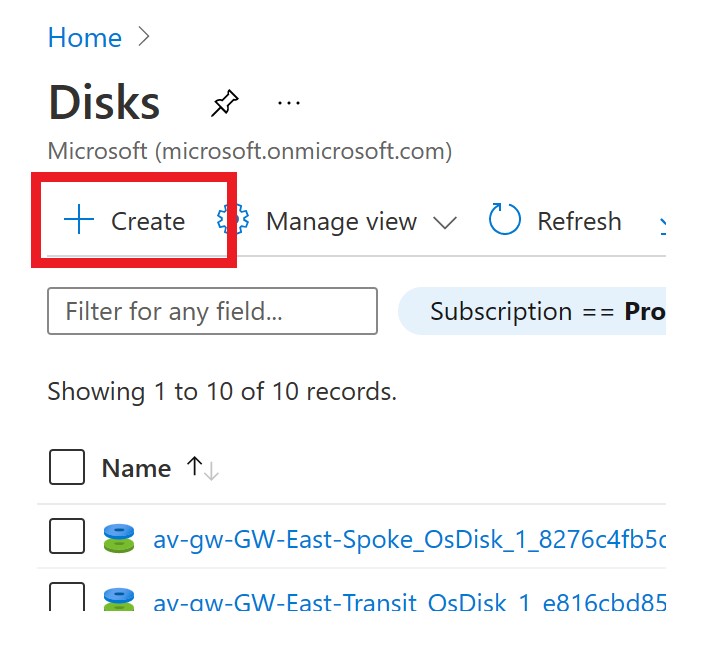
Once the disk(s) have been identified, in the Azure portal, search for disks, then select the Disks service. Then on the subsequent screen, choose the Create option.
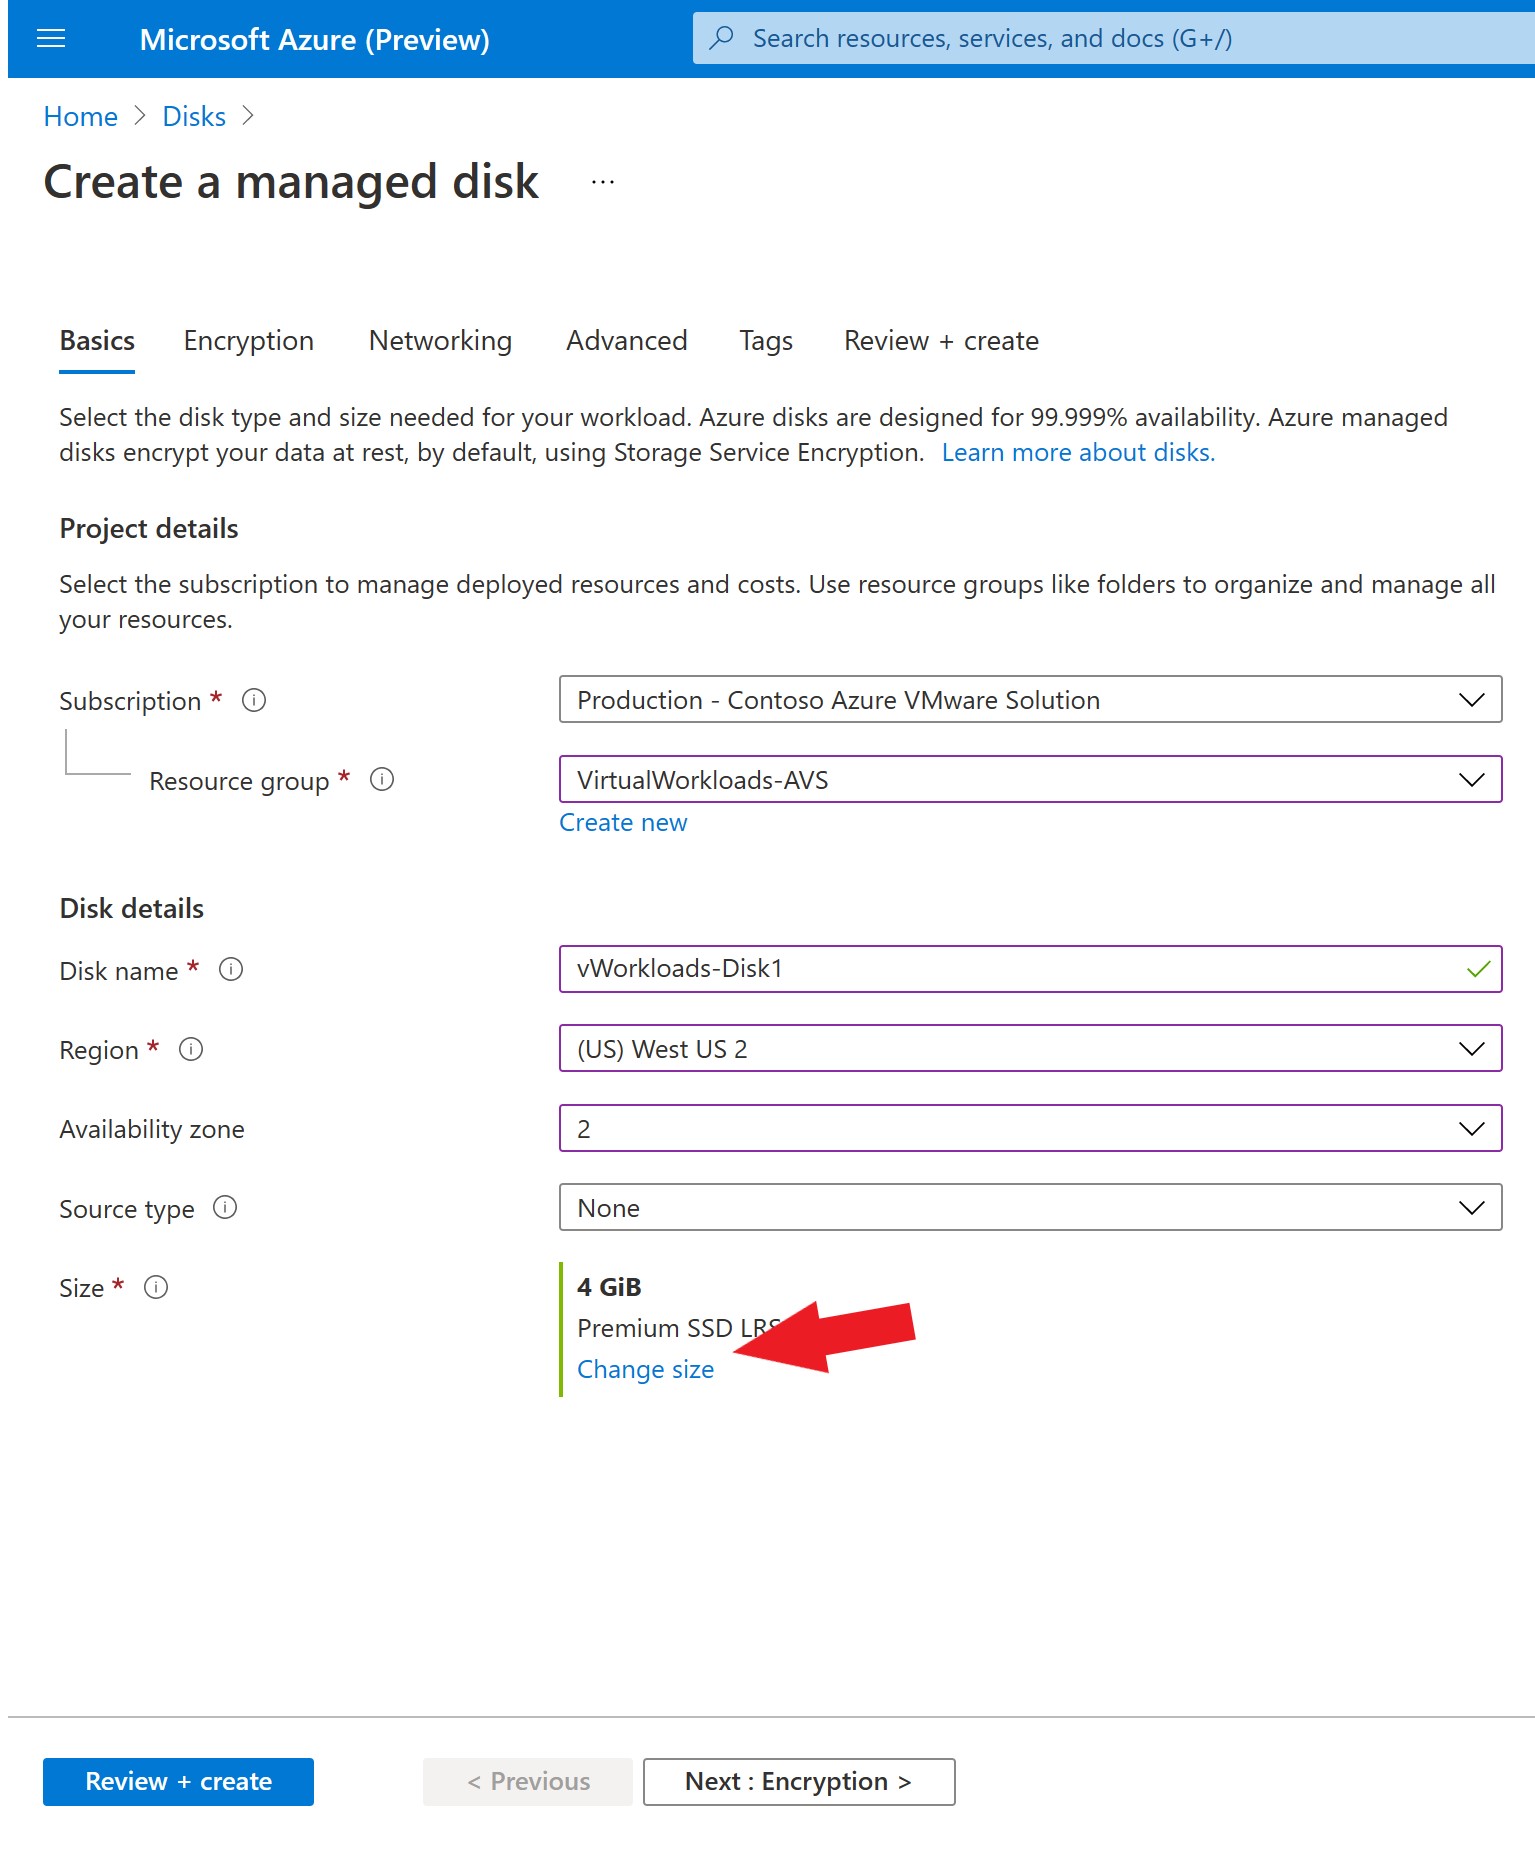
Subscription and Resource Group, choose those as you would like.
Typically I’d put the disk in the same Resource Group as the AVS private cloud.
Disk Name is a friendly name for the disk. Remember, this disk will be the entire datastore, so you may want to name it in alignment with that. If the private cloud needs more than one datastore, deploy more disks. Then add all the disks to the Disk Pool. You can always go back afterward and add disks as needed as well.
The region for the disk must be the same as the Disk Pool (created in a later step). Ideally, you will want the AVS private cloud, disk, and disk pool to live in the same region.
Availability zones are “… unique physical locations within an Azure region”. Ideally, you will want the AVS private cloud and the disk to be in the same availability zone because this will generally mean the closest proximity to the private cloud. But, you will need to submit a request to Microsoft to ID the availability zone of the AVS private cloud.
We will skip talking about the Source type; this will be covered in a future blog post about bringing data into the AVS private cloud.
Finally, select the Change size option and select the disk which you want to create.
Take the defaults for encryption and networking.
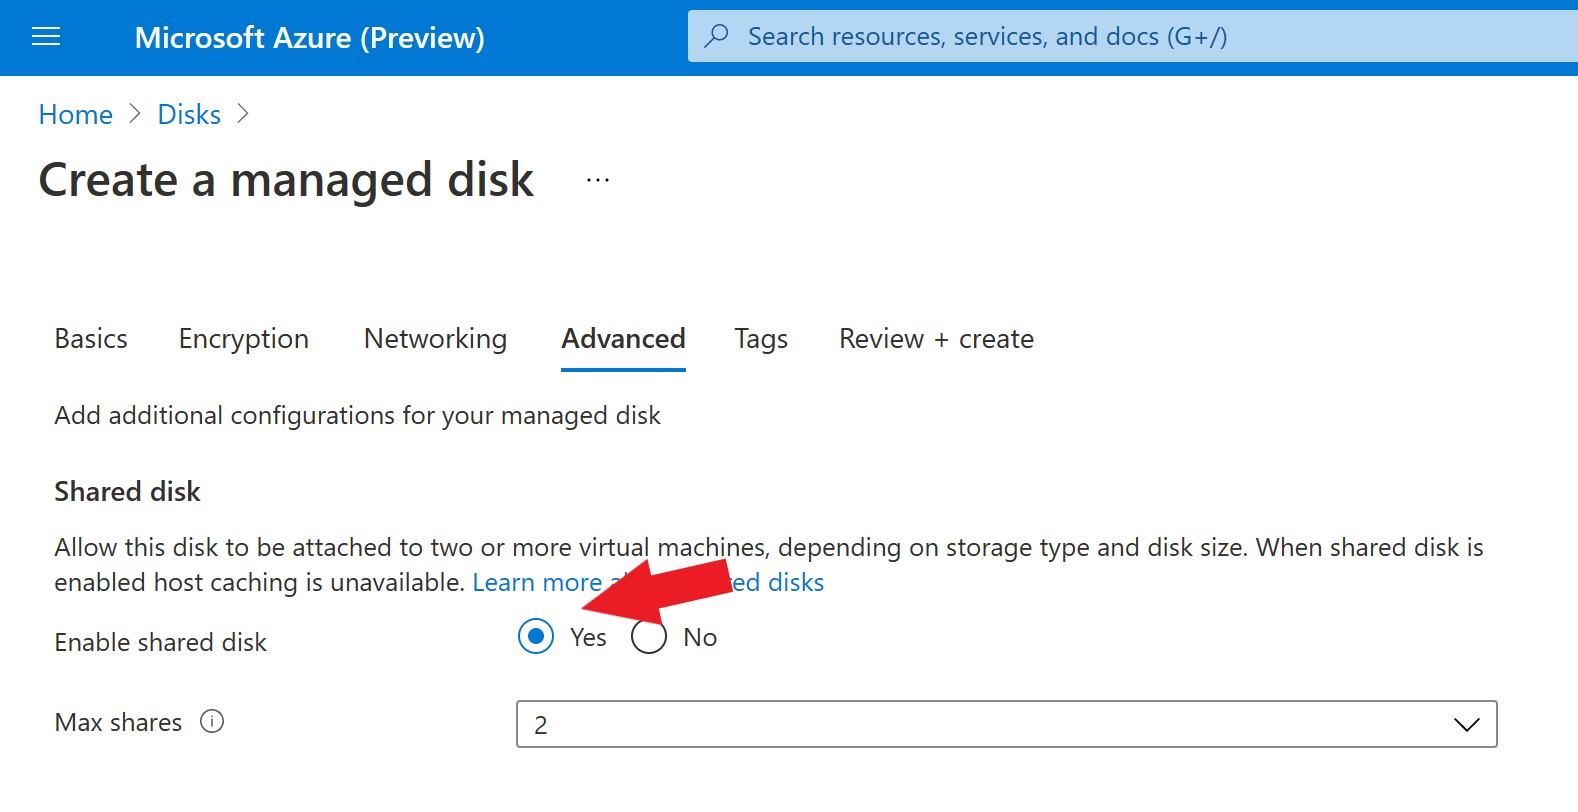
When arriving at the Advanced tab, make sure to change Enable Shared Disk to Yes. This is so the disk can be attached to multiple iSCSI controllers for HA.
Set Max Shares to 2, set Tags as you like on the next screen, and then create the disk.
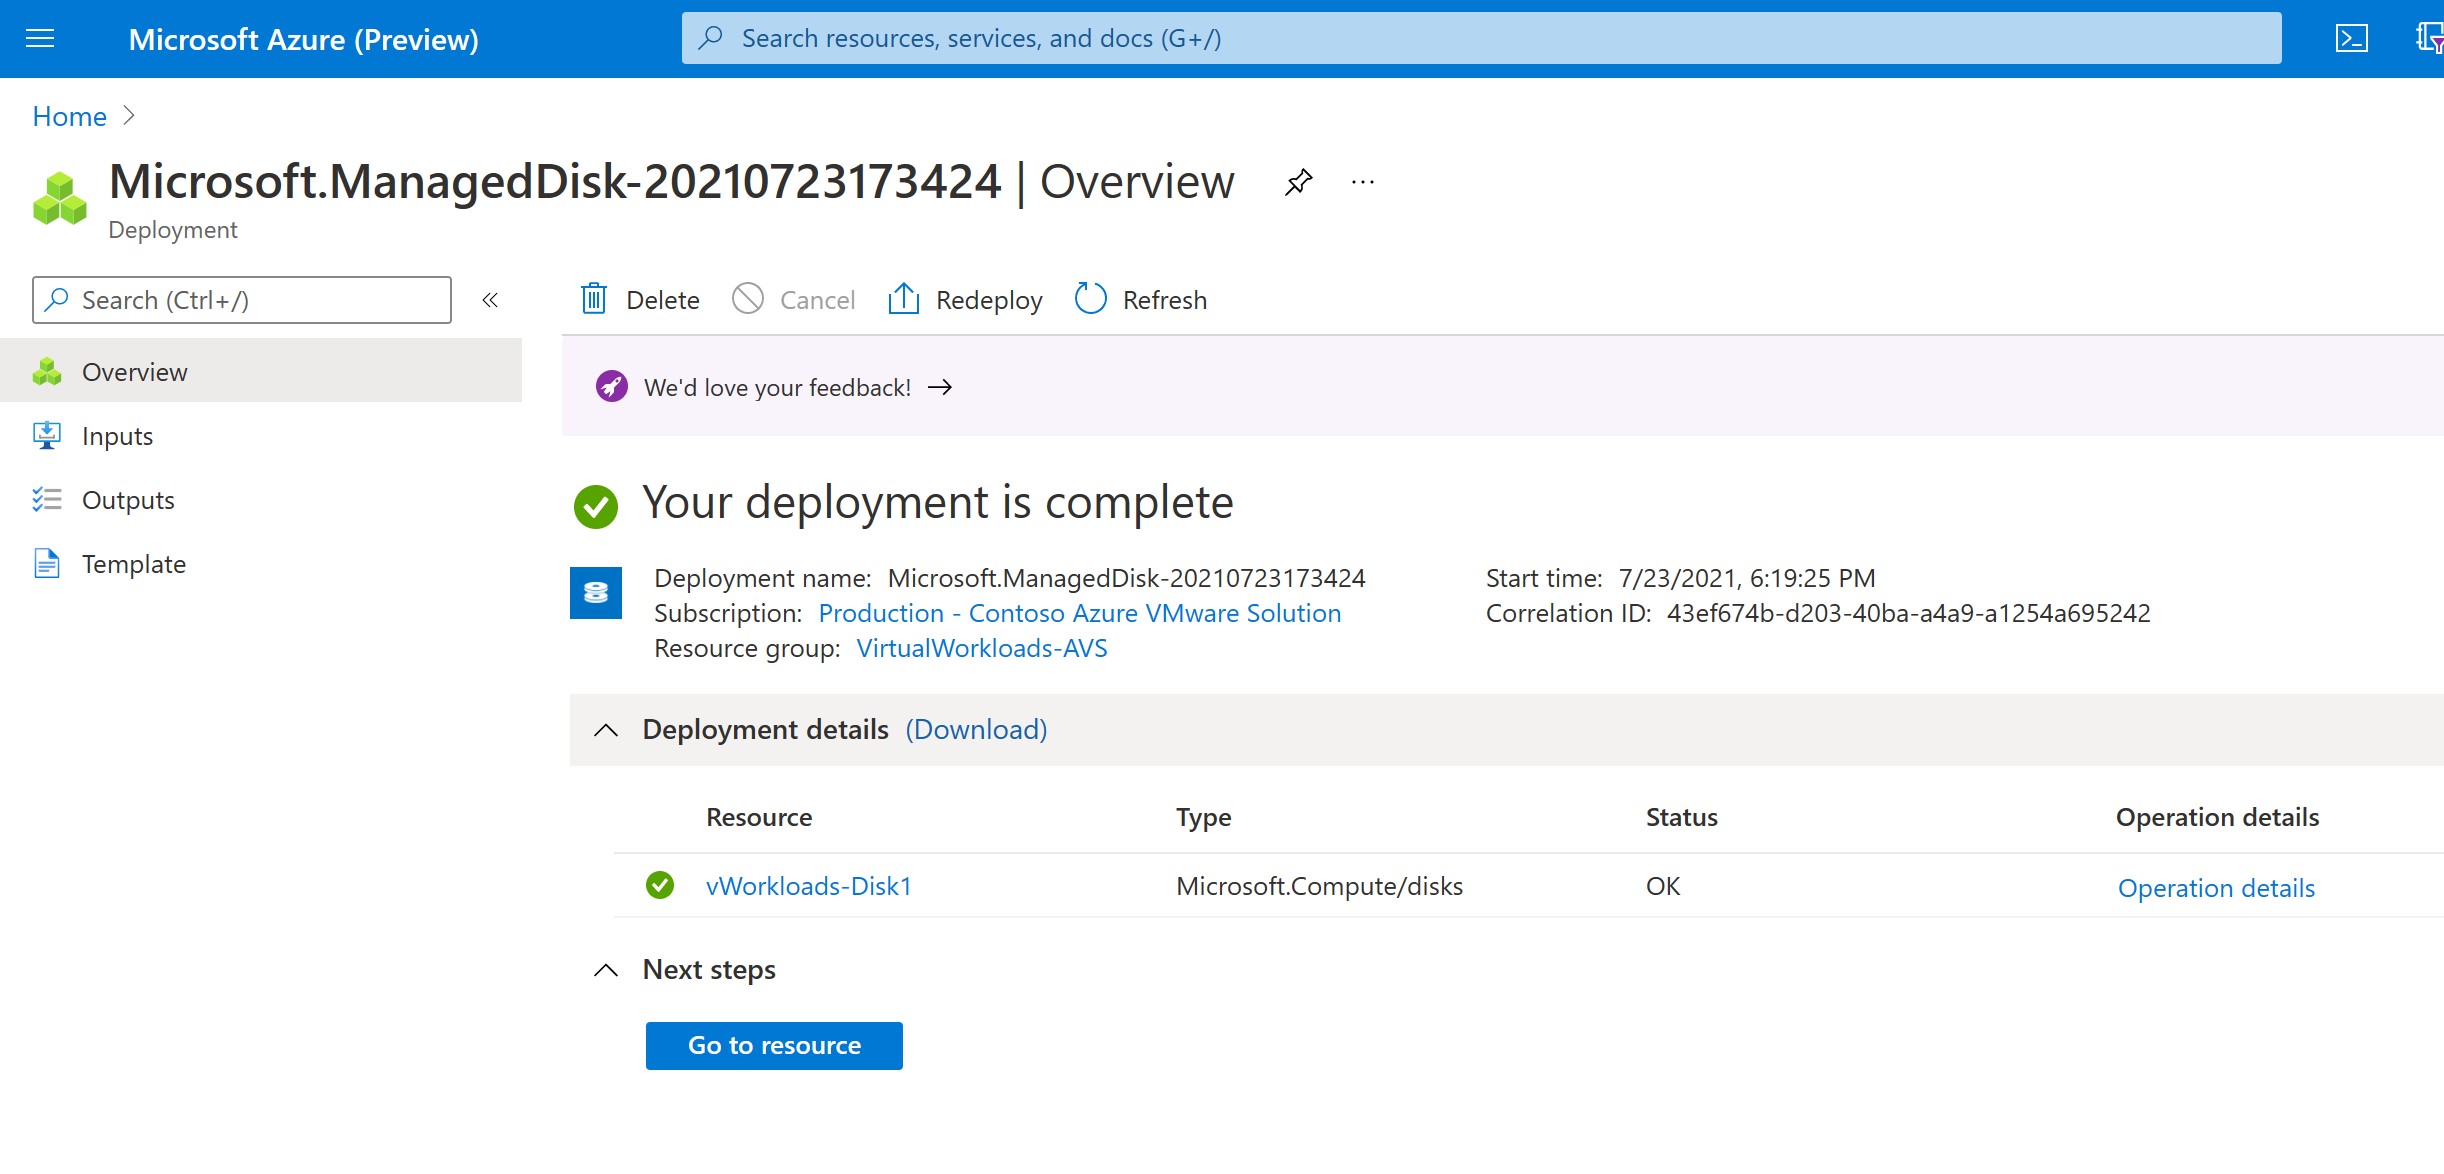
Creation should only take a few moments; then, you will see a screen like this.
Press the Go to Resource button.
The proper permissions now need to be assigned to each disk. Depending on where you have put the disk, you can assign the permissions to the entire Resource Group or just each disk.
We will assign it to the individual disk for this exercise, but the steps would be the same; do it at the resource group level. Resource groups are just logical collections of Azure items.

Select the disk which just got created. You will notice that there are many more than the one just made in the view. Here you see all the disks in the subscription, which includes disks for virtual machines, etc.
If you wanted, you could further narrow the list with the filters at the top of the page.
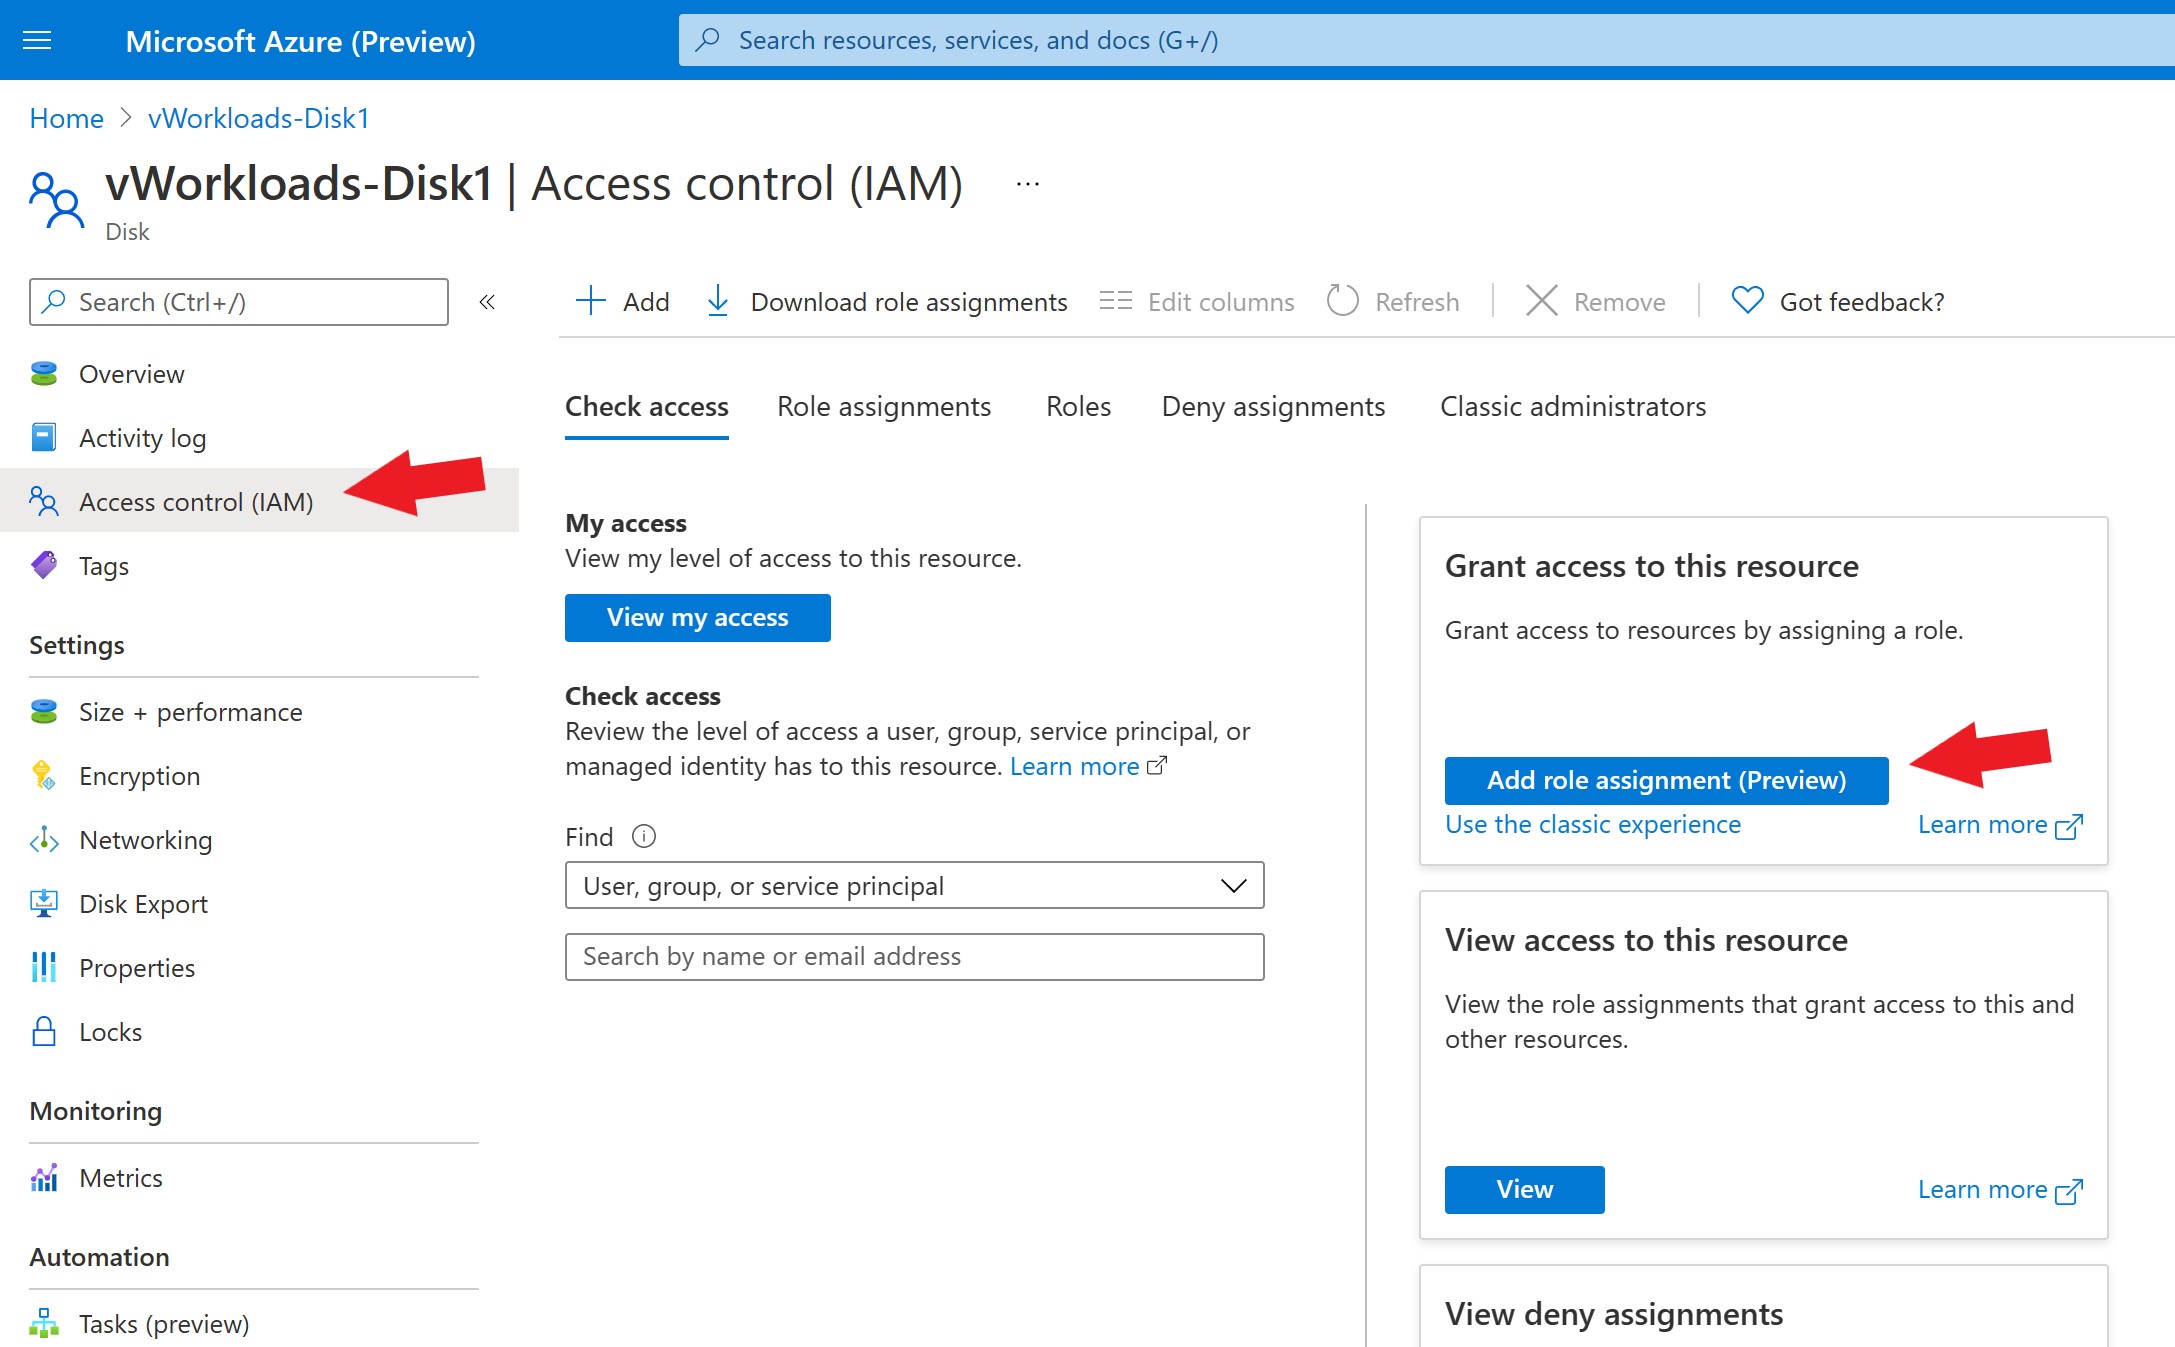
After selecting the disk, choose Access Control (IAM), then Add Role Assignment(s) (Preview).
There are multiple strategies to assign permissions; if your organization has a well-defined Azure security structure or an Azure administrator, lean on those resources. More details can be found here.
For our exercise, we will select Virtual Machine Contributor in the next step.
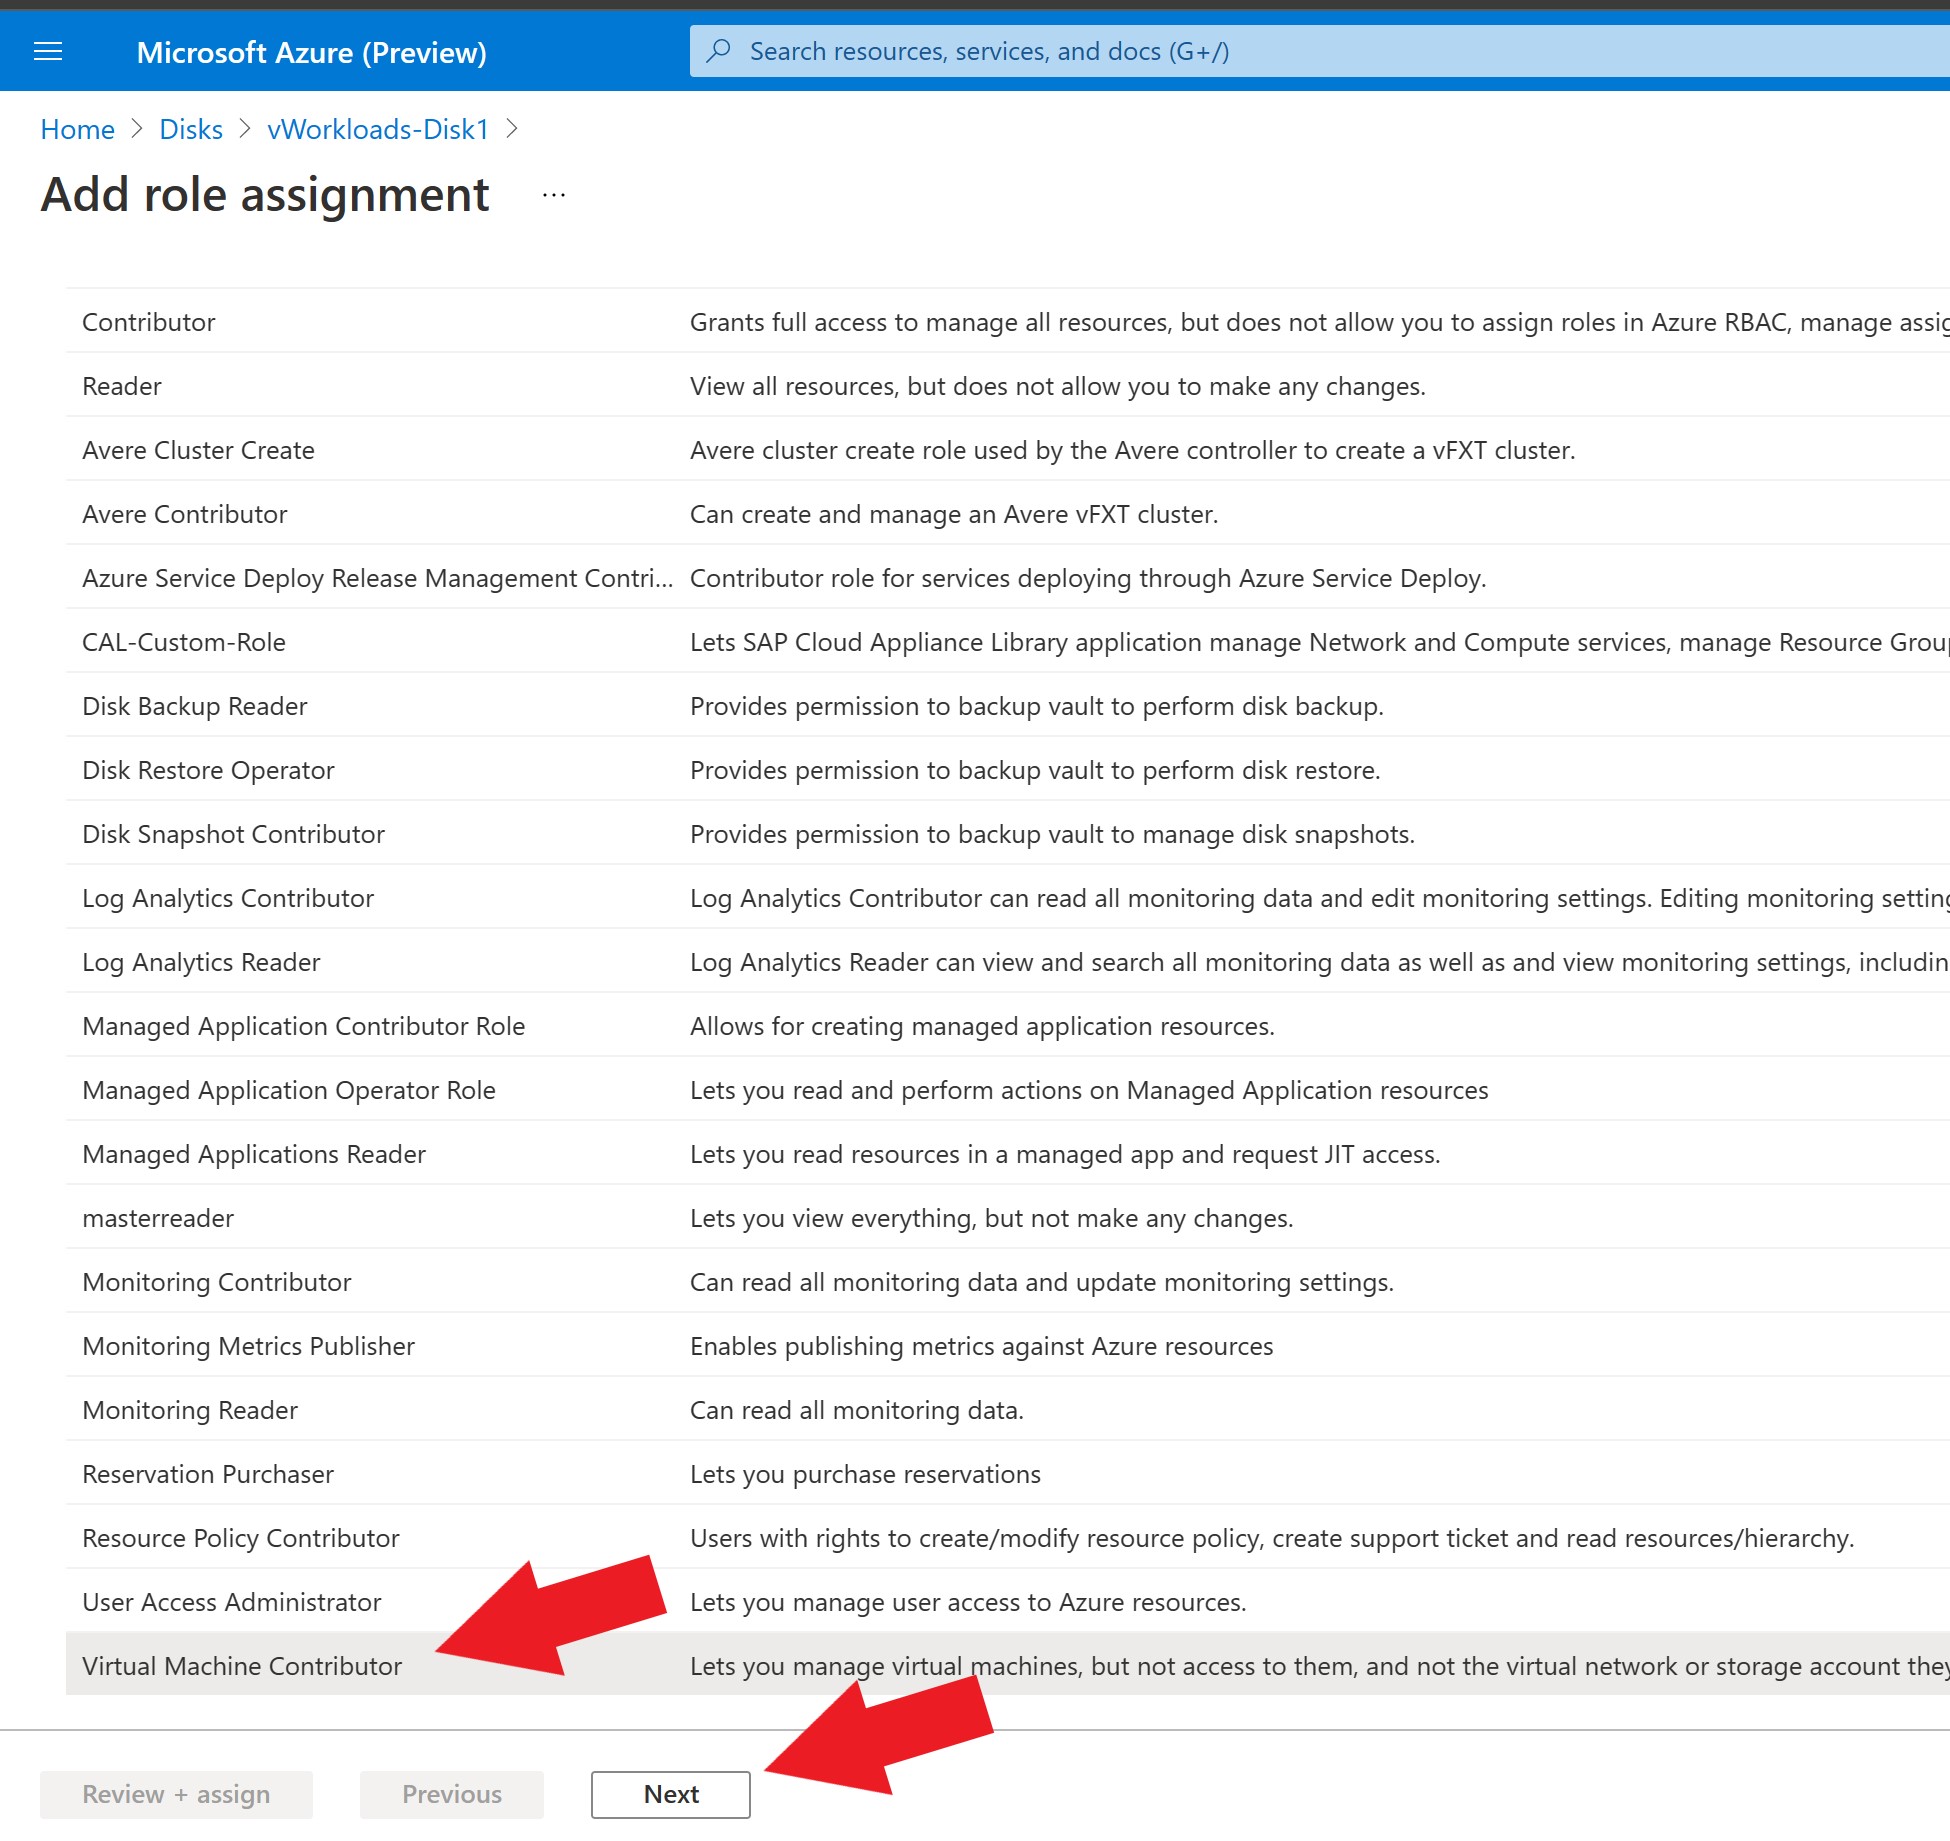
Select Virtual Machine Contributor and Press Next.
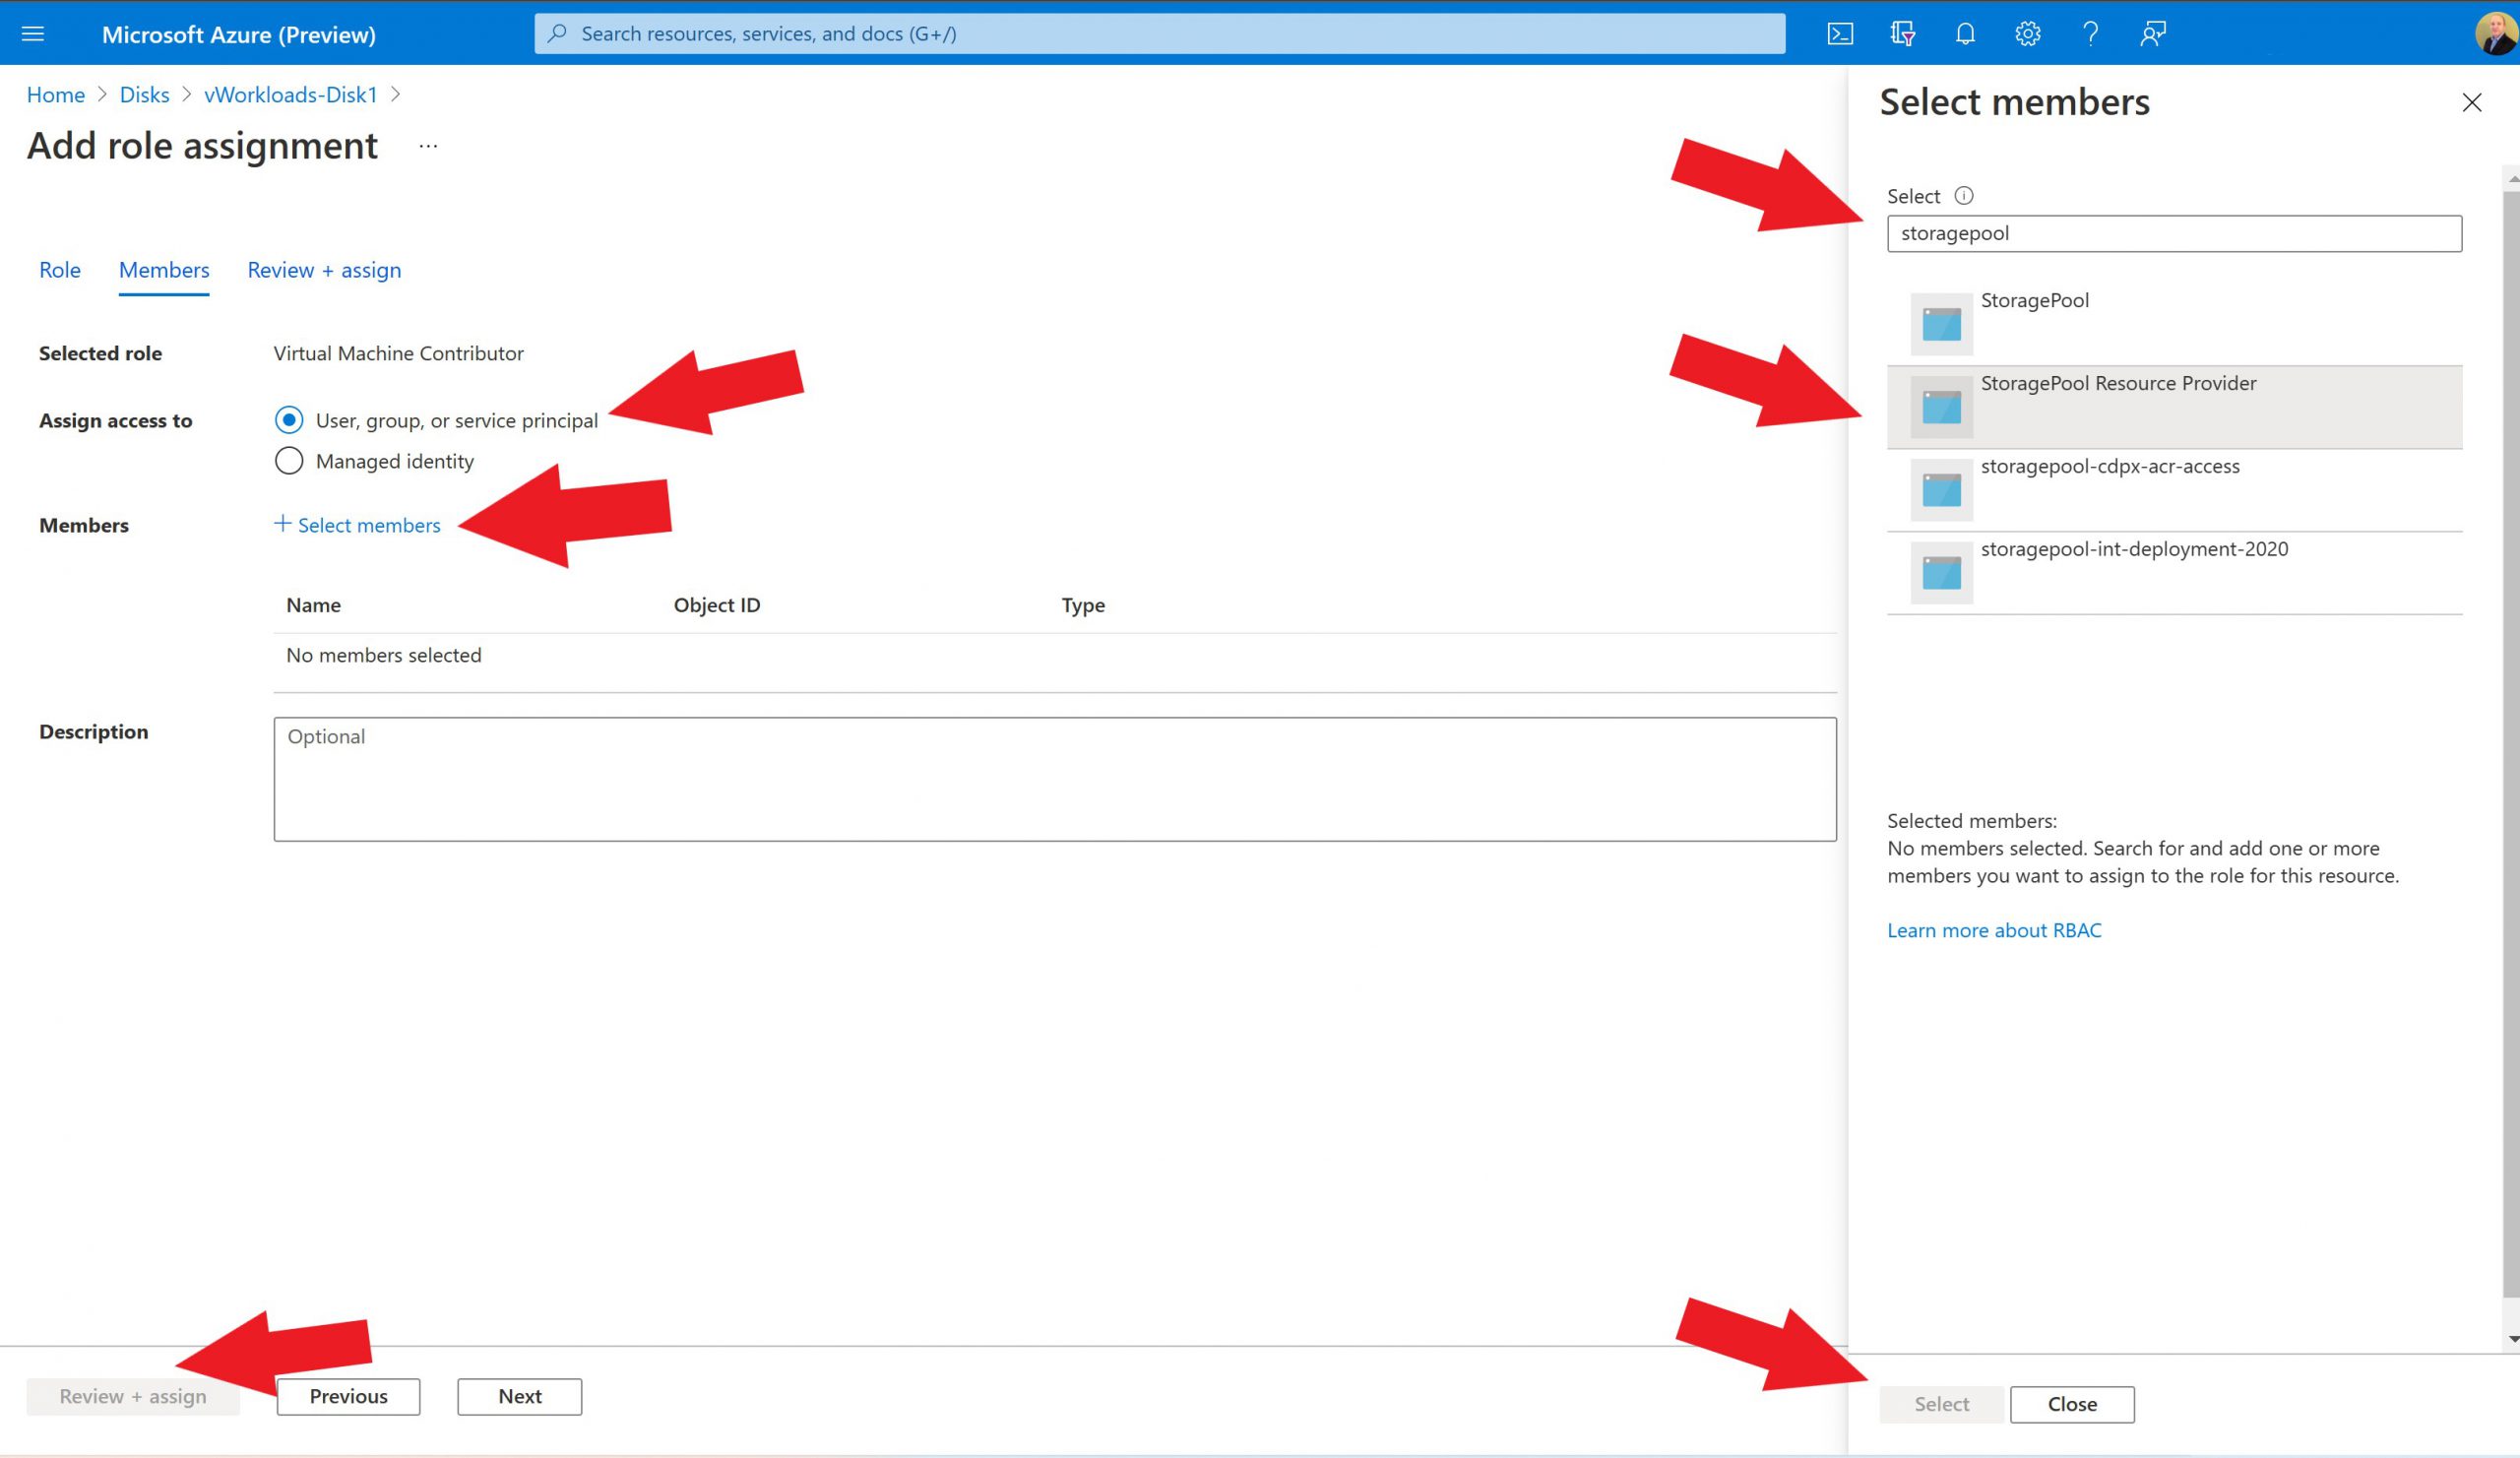
Leave the Assign Access to the default as shown here, then Select Members.
Search for StoragePool Resource Provider and Select it.
Take the defaults the rest of the way through.
Now it’s time to create the Disk Pool.
In the Azure search bar, search for Disk Pool and then Create the Disk Pool
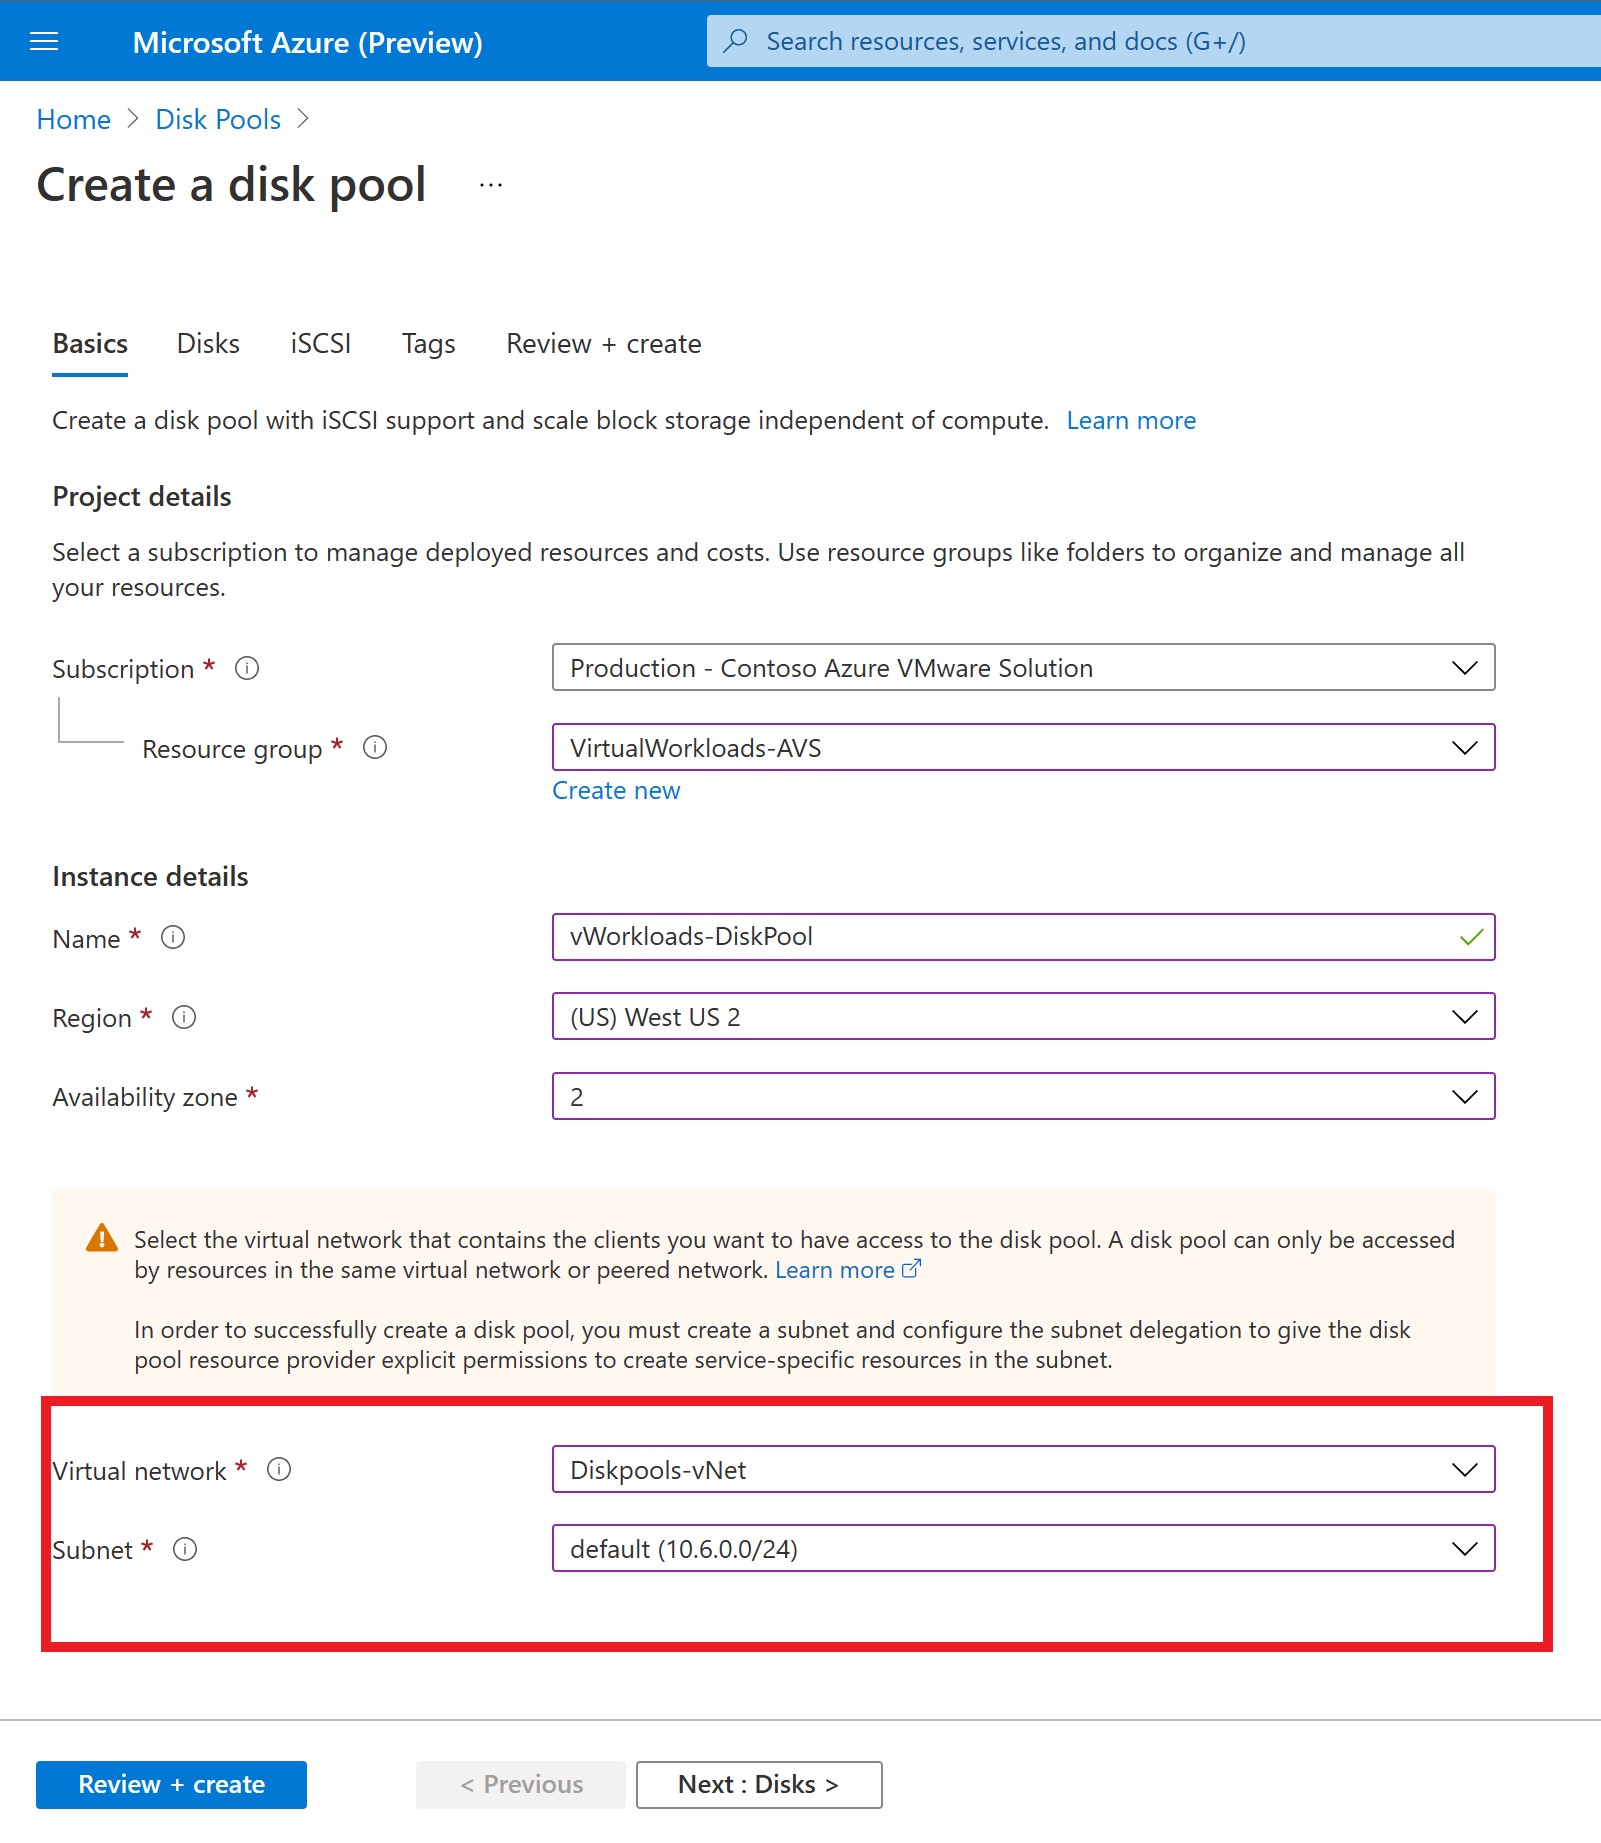
For the first two sections, use the same configuration parameters you used when you created the managed disk above (w/ the exception of the Name, give this a friendly name).
Then for the virtual network and subnet, you should be selecting what corresponds to the virtual network and subnet that was delegated to Microsoft.StoragePool/diskpools provider as outlined above.
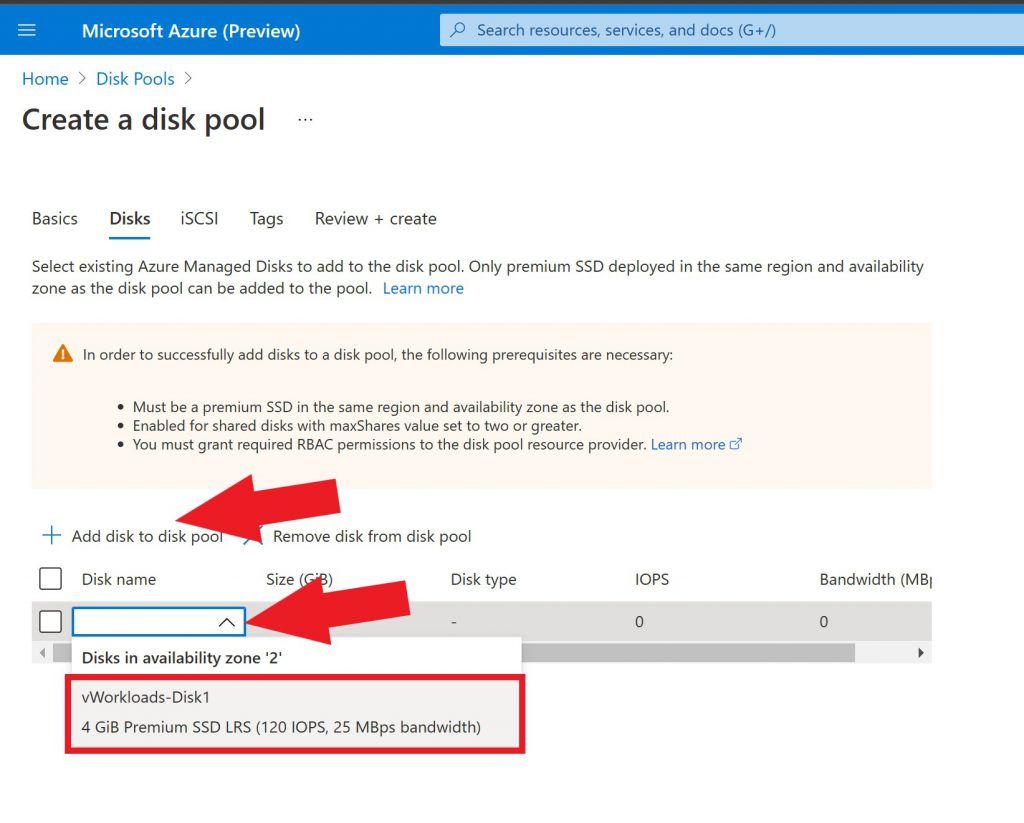
Now select add disk to disk pool, then in the dropdown you should see the disk(s) which were just created.
Choose that disk(s), move on to the next screen.
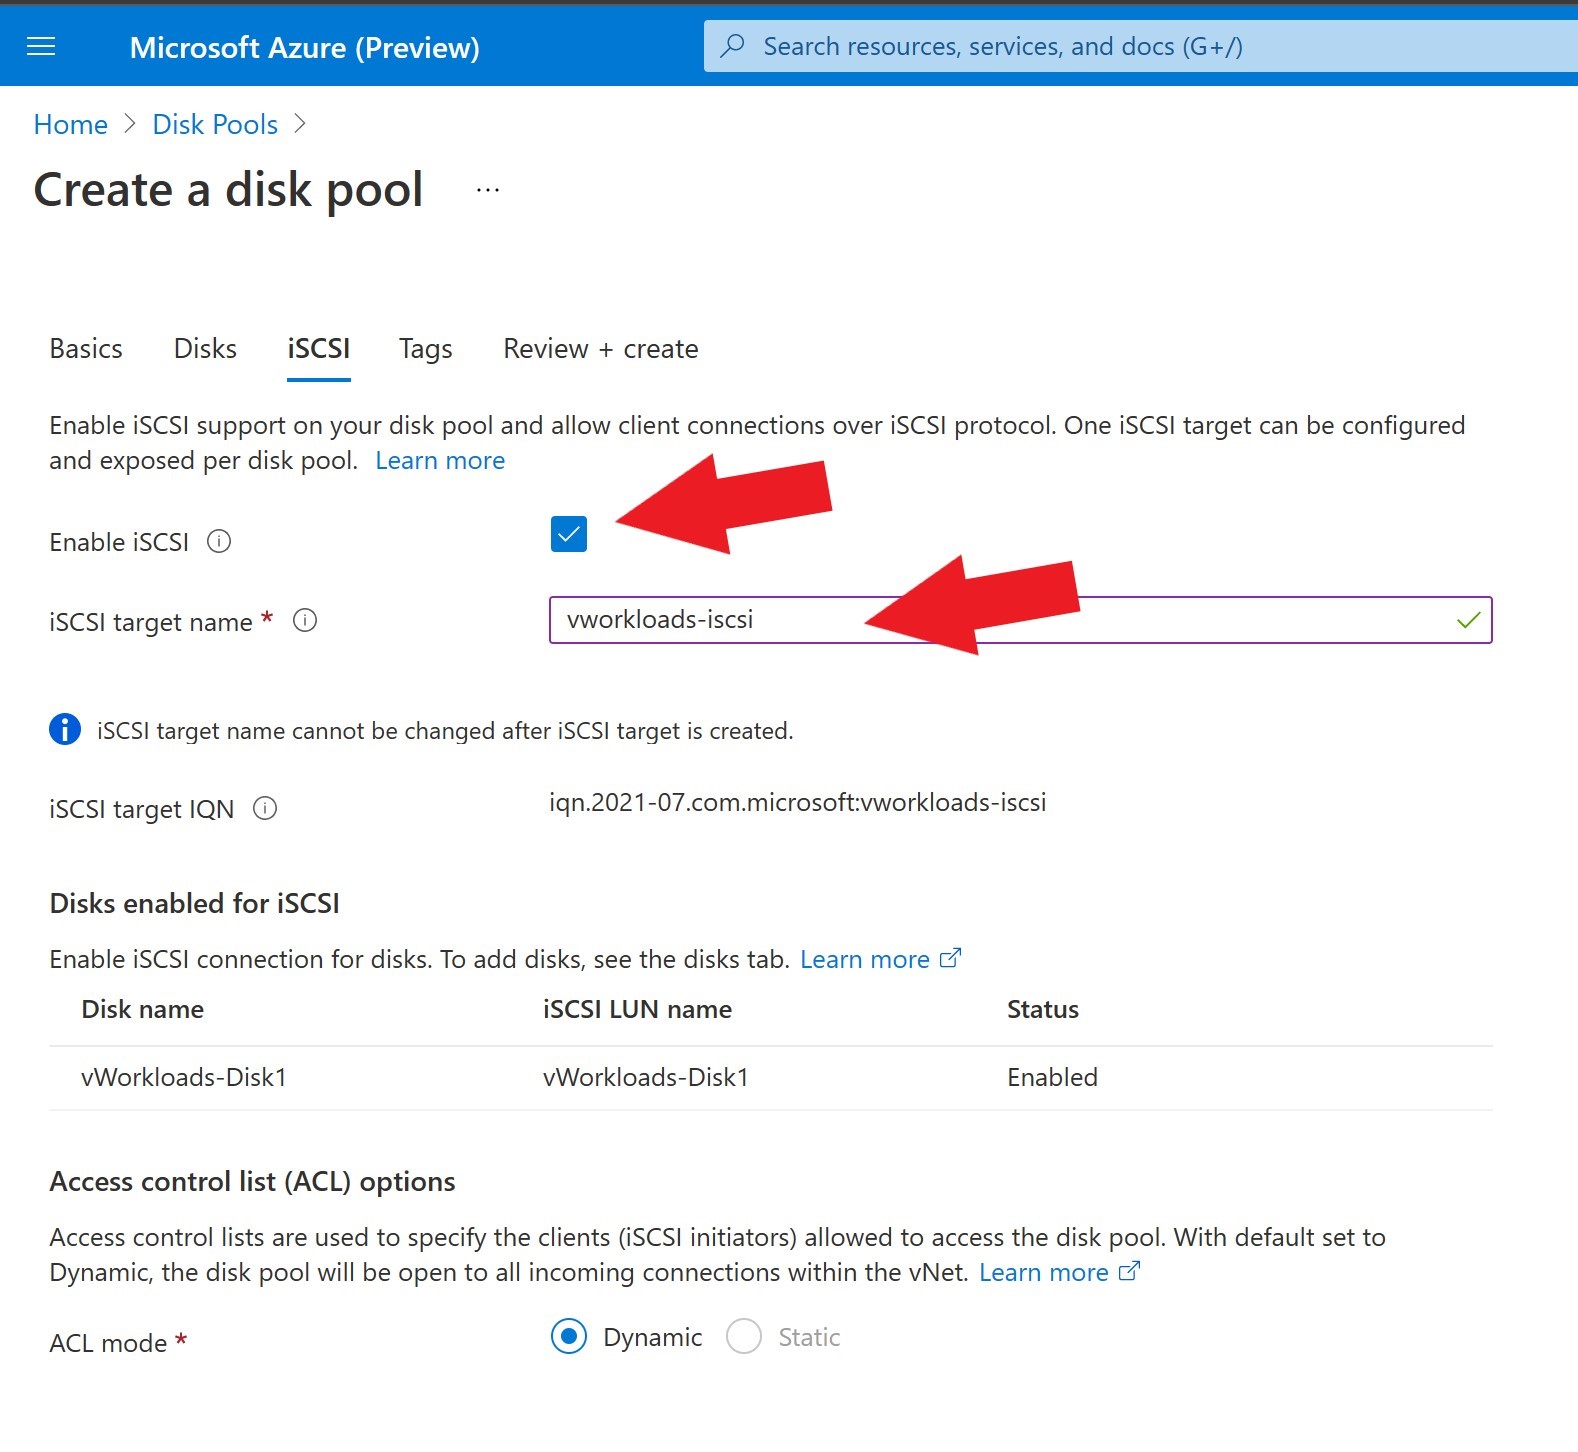
Here the iSCSI target is going to be created for the disk pool.
Enable iSCSI and assign the name.
Leave everything else default, move through the remaining screens and create the disk pool.
Now that the disk pool is created and disks are assigned, it’s time to attach the disk as a datastore to the AVS private cloud (vSphere Cluster). It’s important to talk about the network aspect before we attach the disks.
Ideally, the AVS private cloud and the virtual network where the disk and disk pool resides are in the same region, but the configuration requirements are still the same if they are in different regions. The latency to the disk may be impacted if in different regions.
As you probably know, the AVS private cloud connects with an ExpressRoute to an Azure Virtual Network Gateway, where all ingress and egress traffic flows. If the disk pool is in the same virtual network as the existing ExpressRoute terminates, no further network configurations are needed. However, if this disks are in a separate virtual network, but in the same region (which I would recommend for production deployments), you will have to connect the private cloud and that virtual network. For instructions on how to do that, see this link.
There are multiple configuration options when connecting and ExpressRoute from AVS to a virtual network gateway. The virtual network where the disk pool is deployed will need a GatewaySubnet and a virtual network gateway deployed (this is where the ExpressRoute from the AVS private cloud will connect). The type of disk and the workloads on the disks will drive the virtual network gateway SKU. Check out the suggested network configurations. My suggestion would be to start small and scale up as needed, i.e., standard, high performance, ultra virtual network gateways SKUs (for more bandwidth), and FastPath (to minimize latency).
After all that is figured out and wired up, it’s time to connect the disk pool disk(s) to the AVS private cloud as datastores.
Just run this command from the Azure CloudShell; it will download the script from GitHub then prompt you for inputs. Have to throw a big thank you out to my colleague Thomas Maurer for the assist on this script!
wget --no-check-certificate --no-cache --no-cookies --no-http-keep-alive https://raw.githubusercontent.com/Trevor-Davis/scripts/main/DiskPools/attachdiskpooltopc.azcli; bash ./attachdiskpooltopc.azcliSee the video below for details and where to get the inputs that are being requested by the script.
Copy Files from On-Premises Datastore to Azure VMware Solution Datastore

Fully Automated: From 0 to Migrating Workloads to Azure VMware Solution with VMware HCX